** Reading the Manual on phones and smaller screen tablets is not recommended, since you may not enjoy the best user experience.
Alchemy’s Lab Book is a unified Electronic Lab Notebook (ELN) and Laboratory Information Management System (LIMS) designed to deliver an enhanced formulating, testing, and analysis experience for chemists right out of the box. This comprehensive solution provides a ready-to-use library of test methods, analyses, and charting tools. Moreover, it empowers chemists to dynamically expand this library in real-time, seamlessly progressing from requirements through testing and analysis.
Lab Book offers chemists and scientists a user-friendly experience that is:
Data captured inside a Lab Book is designed for immediate use while also being AI-ready. However, there still exists a degree of flexibility to tailor the Lab Book to meet the specific requirements of individual organizations.
With the appropriate permissions users can define and configure the following aspects within a Lab Book:
These users also have the capability to extend the data model of the Lab Book by incorporating new or existing elements such as:
Alchemy ensures the seamless integration of these additional data types into an AI-ready format by managing the element’s formatting, labeling, and metadata in real time.
Within the Configuration portal, admin users can make minor changes to productized record templates that are part of the unified ELN + LIMS process.
Lab Book is a process template representing Alchemy’s unified formulating and testing tool, with only a single stage.
Pre-configured records found in this stage include:
Additional records can be defined in the configuration portal and added to the Lab Book process template based on organizational needs.
When a user initiates the creation of a Lab Book, the Lab Book Overview record is automatically generated and displayed in the process navigation panel to the left of the open record.
Based on the information filled out when the Lab Book was created, certain fields within this section may be auto-populated. Any fields shaded grey are unable to be modified.

The General Information section of the record includes:
The Requirements section displays Calculated and Measured properties. Target values can be added for each property but are not required fields. However, you will not be able to track the success of the Lab Book, or use the Scan & Score functionality, without these target values.
These tables are able to be pre-populated by selecting Starting Requirements, and then clicking Import Requirements from the General Information section of the record. This method will provide the user with all necessary information regarding materials, processing, and testing.
Conversely, the requirements table can be manually created by selecting the properties a user wishes to target by:

When a property is added to the Requirements table as a target, it enables the user to specify columns for:
Calculated properties are properties Alchemy is auto-calculating based on all materials and their quantities, using an expression defined when a property is created. Calculations of these properties are displayed below the Trials table in the Workspace record for each trial as editable fields - see Calculations for more information.
Tests are properties tested by users in the Lab, leveraging a single property or Test Methods, which is a group of properties. The defined targets for these properties will preset the Testing section of the Workspace record - see Tests for more information.
Constraints include the ability to pre-populate the table and set desired values for each material or processing step displayed. While not required, setting up these constraints is beneficial if you plan to use Scan & Score functionality.
Materials can be added in bulk and will appear in the table in the order in which they were selected. For any added materials or processing step, you can specify columns:

At the bottom of the Lab Book Overview record is the Scan & Score button. This opens the Matching Trials component, where the system will find the best matching actual trials (Samples) from your historical database based on the given requirements, targets, and constraints.
For this button to be enabled, at least one requirement (measured or calculated) must be added to the Requirements section of the Lab Book Overview that has a priority of must have or nice to have. Requirements that have a no target, rate only priority will not be included in the Scan & Score functionality.
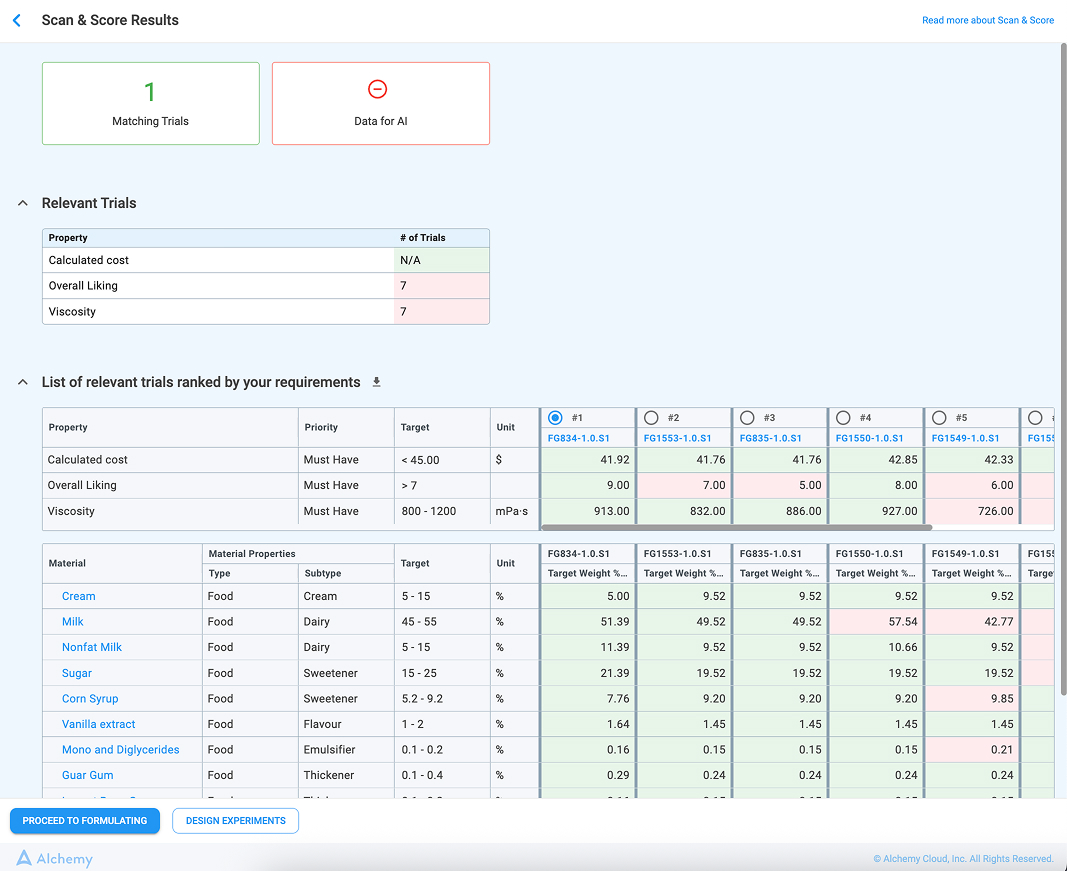
Matching Trials displays up to ten of the best matching actual trials for your requirements.
The top of the modal displays three boxes:
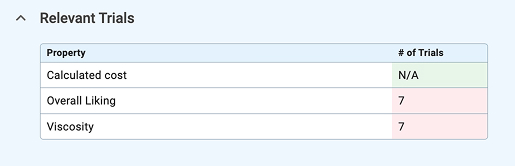
For each trial, you can see:
When the desired trial is selected, the Proceed to testing button is enabled. Clicking on it will:
With the Starting Trial selected, the Workspace record will have:
If the Material Constraints table on the Lab Book Overview is filled in, the Scan & Score will also be extended to search trials based on material constraints. Only the trials that have matching ingredients will be taken into account.
While performing Scan & Score, one score is calculated for the performance targets, and the score for how well the trial matches the material constraints is calculated separately. They contribute equally to the final score, which the final rank is based on.
For additional information about Scan & Score, please see the dedicated manual to learn more.
Alchemy's DOE (Design of Experiments) functionality is a powerful tool that addresses the situation when there is no data or only very shallow historical data, preventing the system from running AI. It will help you extend your dataset in the most efficient manner possible (i.e., with the smallest, well-distributed, statistically optimal dataset) so that we can train models and run AI.
No prior experience with machine learning, data science, or statistics is required to use DOE. Any chemist or scientist will be able to input their formulating objectives and constraints to be guided in the most efficient manner to achieve their goals.
When enabled, the Design Experiments button is visible at the bottom of the Lab Book Overview record. It is possible to create a design experiment when:
For additional information about Alchemy's AI and DOE, please see the dedicated manual for additional information.
🔐 Please discuss how to add this to your system with your CSM or Salesperson.
A Lab Book can have as many Workspace records as needed. New records can be added by clicking:

The General Information section of the Workspace record has the following fields:
If no starting requirements are selected prior to creating this record, the system will not display trial data, requiring you to add the necessary materials and processing steps manually.
The Trials table is where theoretical and actual requirements are designed. This table is pre-populated if a Starting Trial has been selected. However, data within the table remains editable.
Target Weight: The desired weight for each trial.
Click the Settings icon and change the unit for Weight.
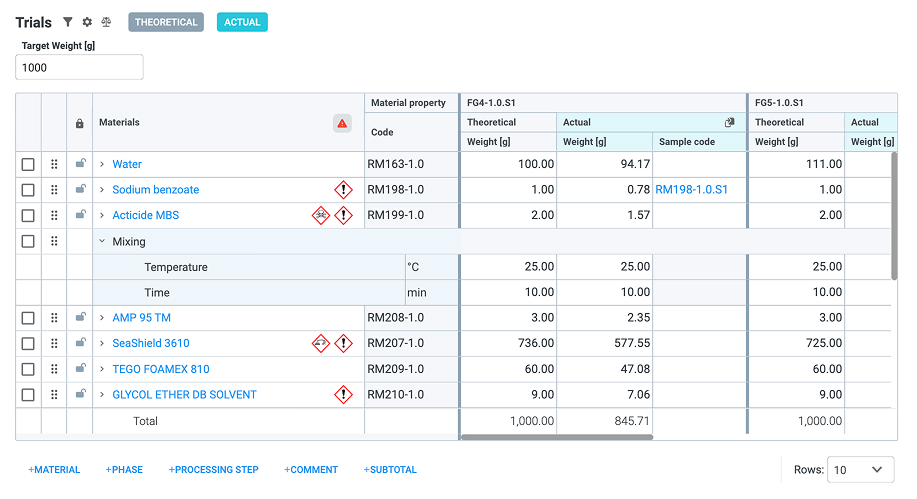
Trials tables display the following default columns and information:
Additional Material data and columns can be added to the Trials table through the Settings icon and include:
Materials and Material Properties columns will remain visible even when horizontal scrolling is required to view additional trials.
For additional information, refer to the Settings section.
Add a new row to the Formulations table by clicking the options directly beneath the table:
Clicking a checkbox for a particular row in the table will display actionable options icons:
Rows added via the options displayed beneath the Trials table will appear at the bottom of the table. Rows added via the “+” icon will appear directly beneath the row that was selected.
Materials can only be added to a phase or processing step by utilizing the “+” icon beside the phase name.

Total: A row displayed beneath the Trials table displaying sums for each column.
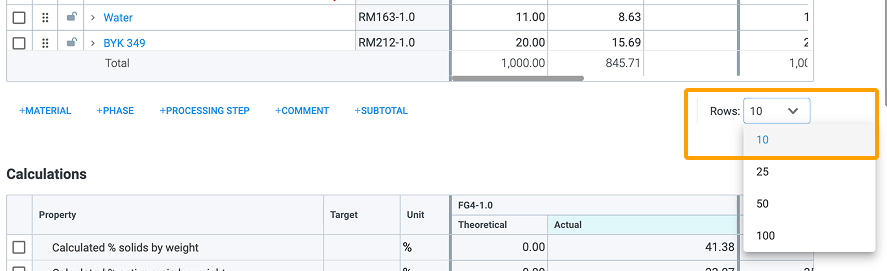
Freeze Headers Row Picker allows users to specify the number of rows simultaneously visible within tables.
A bill of materials (BOM) is a list of only the materials and their corresponding amounts from the recipe table of a Material record. This information is displayed within the Trials table of a Workspace record to assist users with sample preparation. Processing steps, phases, and comments are not included in a BOM.
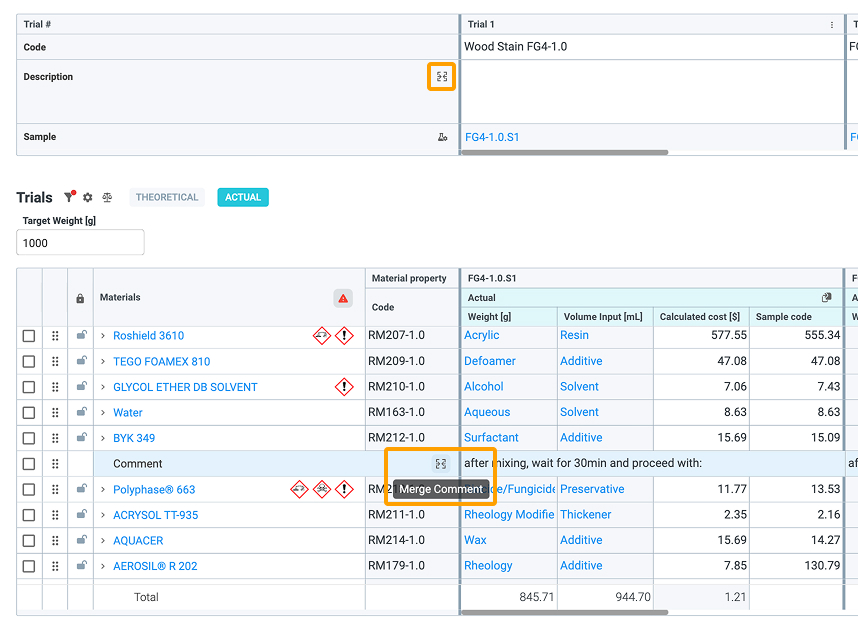
.jpg)
Split / Merge functionality enables users to control how comment and description fields are displayed across multiple trials in the formulations and general (where description field are) table. This helps manage screen space and organize comments and descriptions more effectively.
The Trials table contains a series of filters that can be applied to the displayed data. These filters allow a user to define which type of rows should be visible in the table.
By default, all rows and columns are enabled when the Trials table is generated.

Options to filter by include:

Theoretical and Actual filters can be applied through the buttons above the Trials table, as well as through the Filters icon.
After filters have been applied, an indicator will appear with the icon to demonstrate displayed data in the Formulations table has been manipulated from its default view.
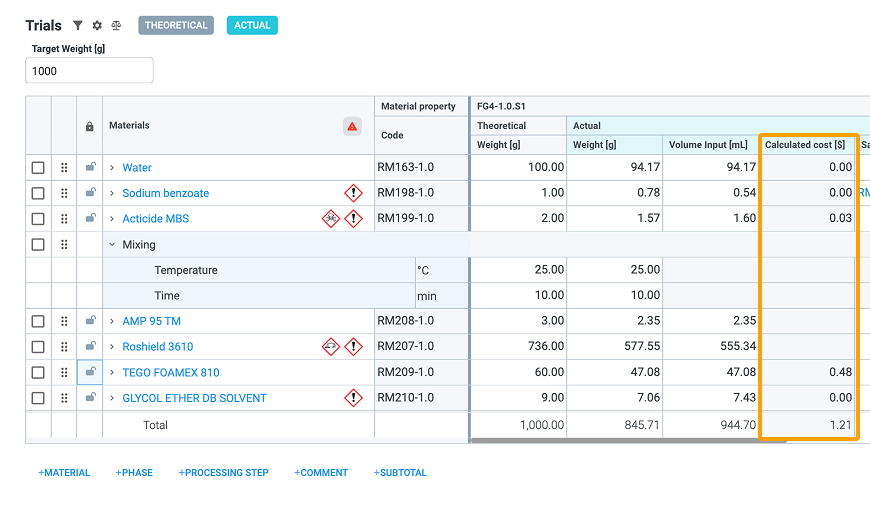
.jpg)
The Trials table allows a user to display additional data and columns relevant to their active trials, accessible through a Settings icon.
The system will pre-populate your Settings modal based on settings from the selected Starting Trial. If you change the Starting Trial inside the Workspace record, the Settings modal will also be updated to match the updated Starting Trial.
This scenario will occur one of two ways:
OR
If a new Workspace record is created without previously selecting a Starting Trial, the Settings modal will be blank in the new record.

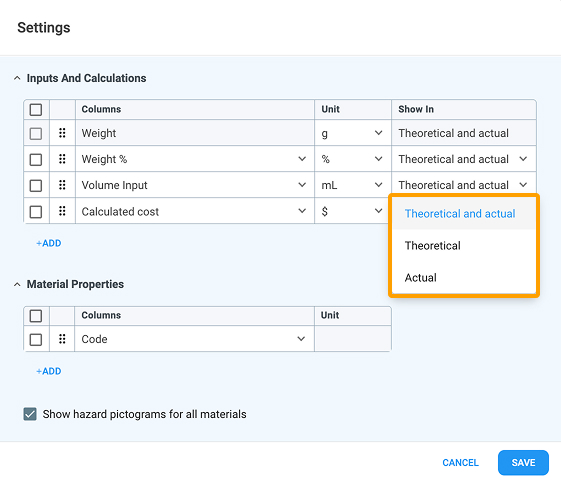
Clicking the Settings button will open a modal separated into the following sections:
In Alchemy, trials are done by Weight as a default. Within the Settings modal, the user can select the desired units based on their needs (refer to Appendix 1 for a list of supported units). However, it is important to note that updating the unit does not scale any existing values in the Trials table. To scale these values, use the Scale feature.
To alter how trials occur, click + Add to display additional columns in the Trials table. A dropdown field will display, with a list of all available properties that can be added to the table.
Properties included in this dropdown require either of the following two conditions to be met:
Contributing properties are always calculated whether they are added to the Trials table to be visible or not. Calculations are only calculated when they are added.
The system allows for the selection of whether a chosen property is displayed in the theoretical, actual, or both parts of the trials.

The remaining columns are uneditable and represent properties defined as material contributions only. These columns can be used to track how much every material is participating in the entire trial based on a particular property.
Non-modifiable columns may include:
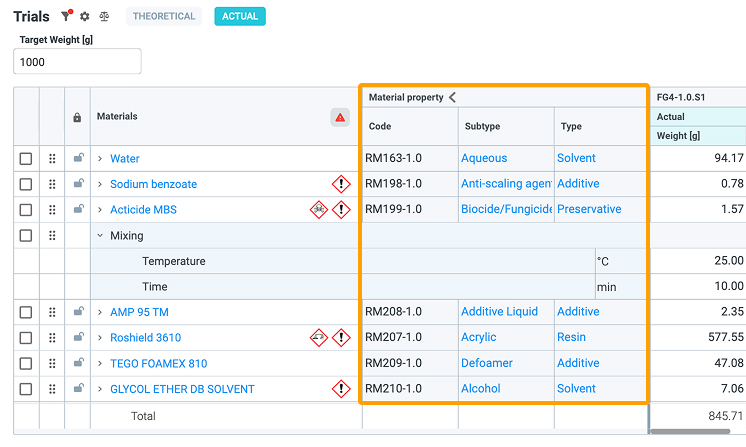
The Trials table can be configured by the user adding any material property such as:
All possible material properties include:
The Material Property section of the table is able to be collapsed, showing only the first Material Property. However, the default view is to display all added Material Properties in an expanded view.
The Scale functionality is used to maintain the ratio between a trial’s materials to align with the Target value of one or more trials. Scaling can be applied to:

Clicking on the Scale icon will open the corresponding modal which contains the following options:
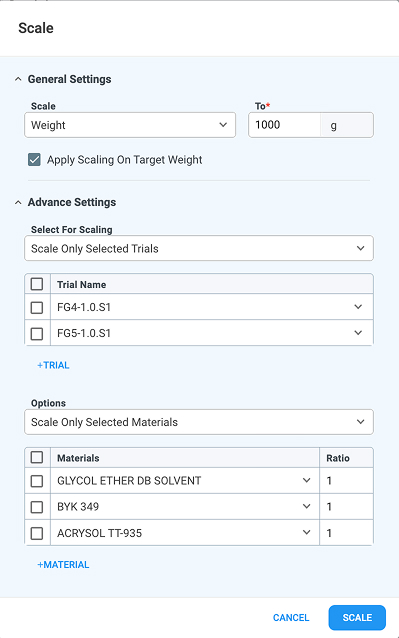

When scaling to Weight, the option to Apply scaling on Target weight will be visible in the modal. Enabling this option applies the user-defined weight value to the target weight of the Workspace record.
Inside the Trials table, the first column is reserved for a lock/unlock feature. By default, all rows are unlocked. Clicking on the empty cell to the left of the desired row in the Materials column, a lock icon will be displayed. A locked row enables the following:
To unlock the row(s), click the lock icon a second time.
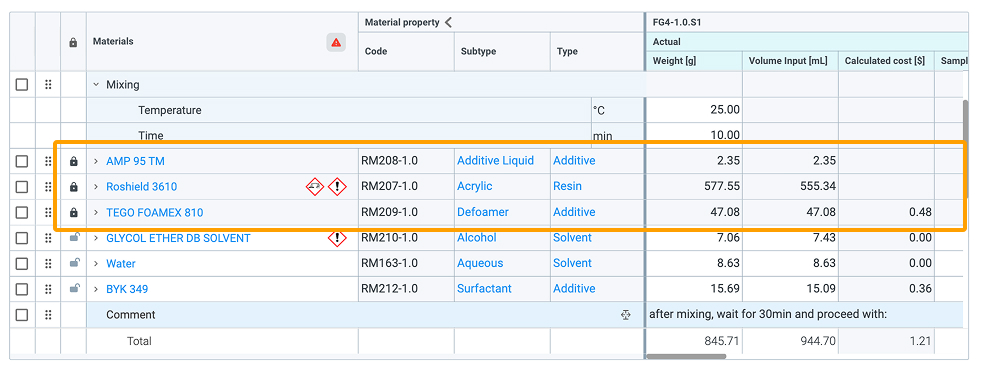
To lock, or unlock, all rows in the Trials table click the lock icon in the column header.
Trials can have multiple phases, where each phase acts as a small trial for itself due to it having its own specifications. One such example for using a phase within the Workspace is when you have a group of materials that need to scale separately from the rest of the trial.
A phase can be added one of two ways, by clicking:
A modal will then appear to enter the phase name. Upon saving, the phase will be added to all trials in the Workspace.
A drawer for the phase can be accessed by hovering over the phase name, which will display an edit icon. Clicking this icon will display the drawer in full-size mode, however, the drawer can be resized to display in half-size mode by clicking the arrow icon to the left of the visualization icon.
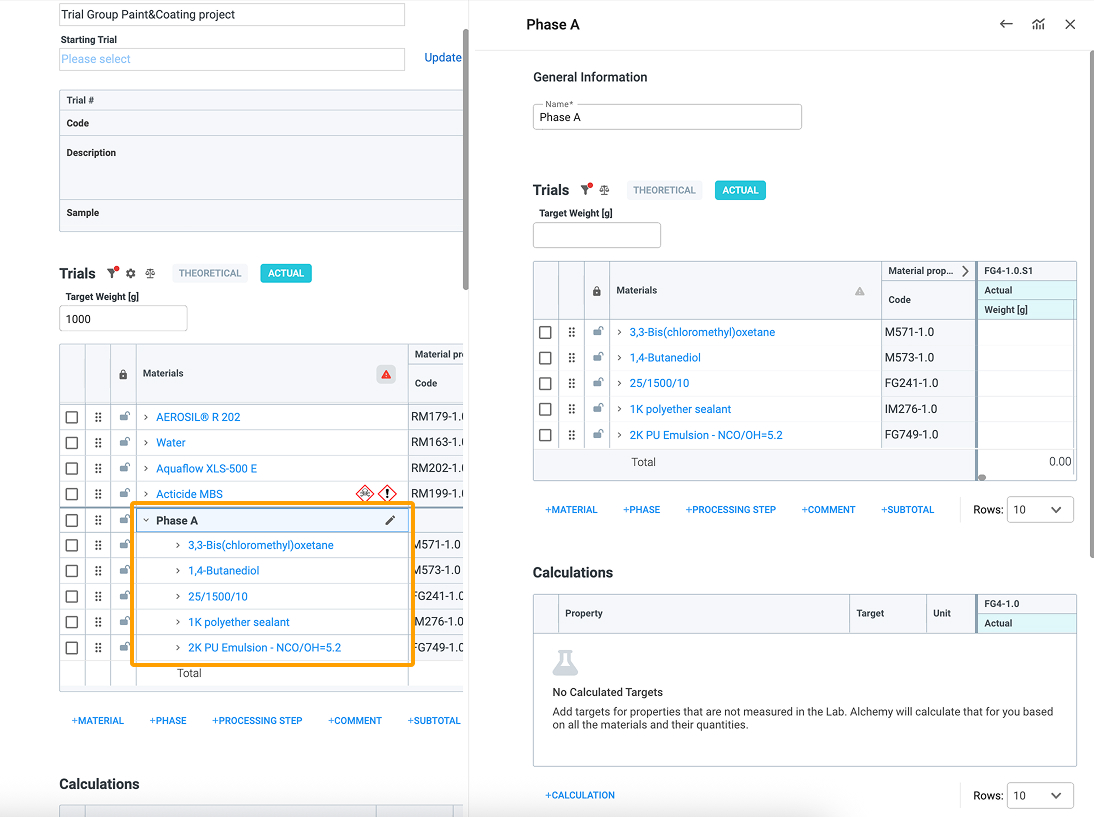
Inside the Phase drawer, you can complete the following targeted actions for the displayed phase:
Any action taken in the phase Trials table within the drawer will be reflected in the Trials table of the Workspace record.
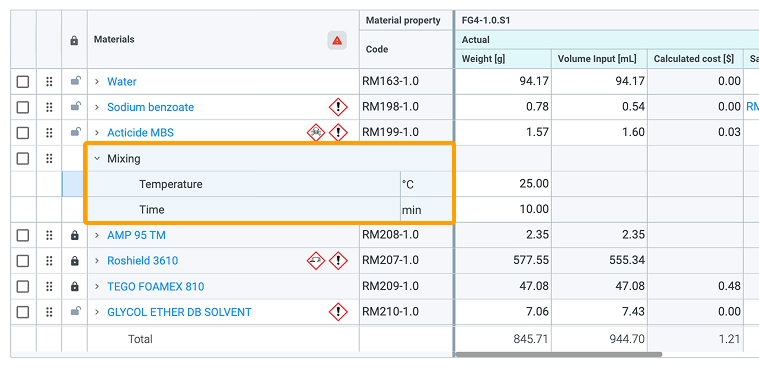
The processing step is used to define how select materials should be processed (e.g., mixed, baked, etc.) by specifying conditions (e.g., time, equipment).
Previously defined processing steps can be added to the Trials table by clicking the:
Either option will display a dropdown menu with the library of processing steps. Once a selection has been made, the processing step appears in the Trials table as a blue section that is applied to all trials.
Processing steps can be collapsed or expanded, with the option to change units at the condition level.
Once a processing step has been added to the Trials table, values can be changed for each condition’s trial.
If a new processing step is required, click the + New button in the left-hand navigation panel and select Processing Step from the records section.

Each processing step has:
Once the record has been completed and displays as valid, the processing step should appear in the library under its given name.
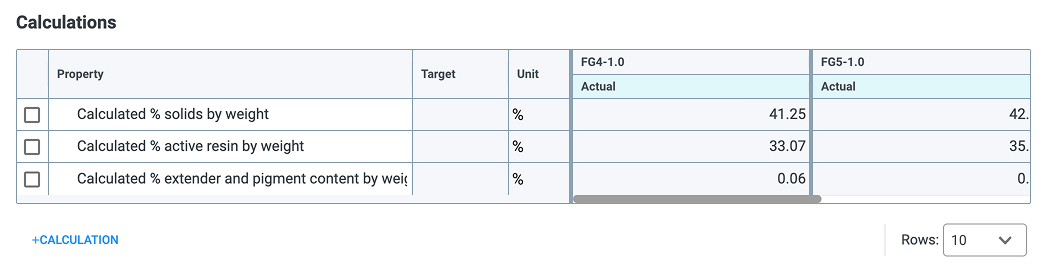
Calculations displays a table of all calculated properties added in the Lab Book Overview, separated by theoretical and actual trials. Additional calculated properties can be added while testing by clicking + Calculation.
Calculated properties are calculated based on the expressions defined for each Property. They can be defined as editable, allowing the user to change its value from the Calculations table and scaling the whole trials to achieve a new value.
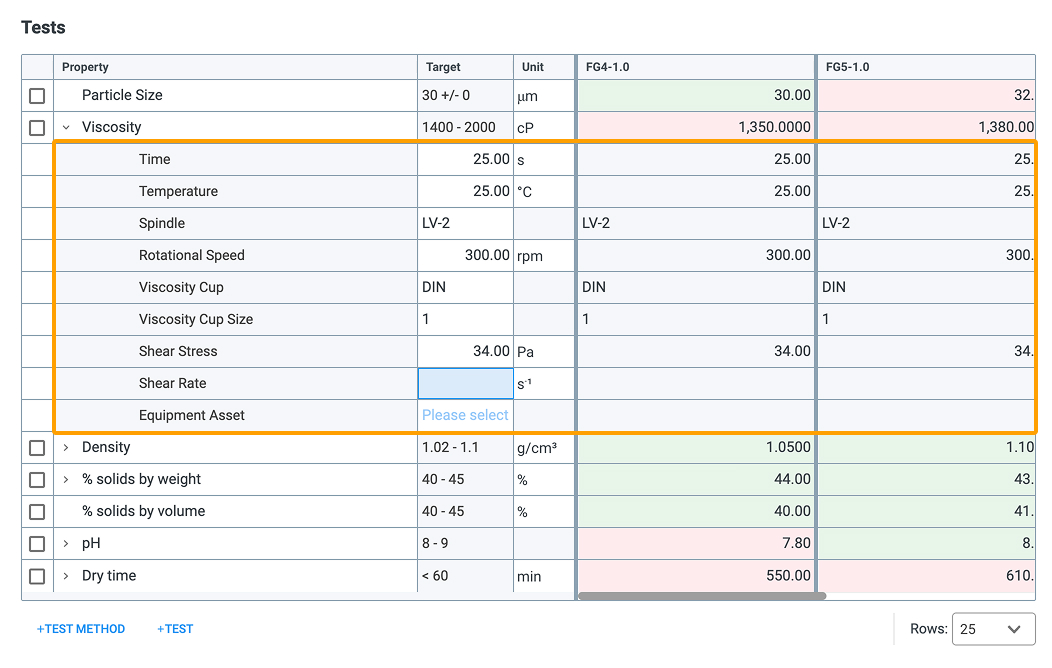
The Tests table provides the user a place to notate their test results for actual trials. The measured properties and their respective target values will be pre-populated from those entered in the Lab Book Overview record.
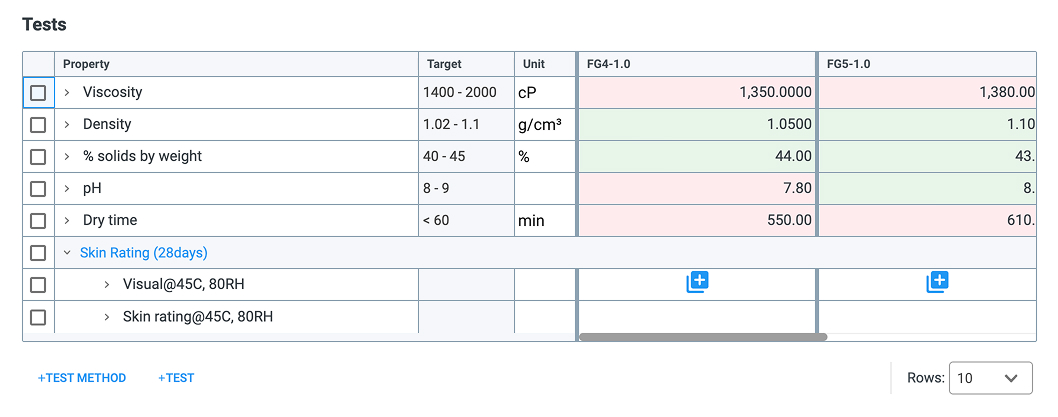
Certain properties can be defined based on the calculations of other measured properties. For example, elongation percentages can be calculated based on the measured initial length and the total length after the elongation process.
While the table remains editable until samples or actual trials are created, additional rows can be added by clicking:
Add Tests
To add measured properties through the Add Test modal, you must first define what properties are being measured, as well as the applicable units. The user can select one or more properties via the dropdown, which will display a list of all available system properties measured in the lab. Additional properties can be added by clicking + Test.

Key functionalities:
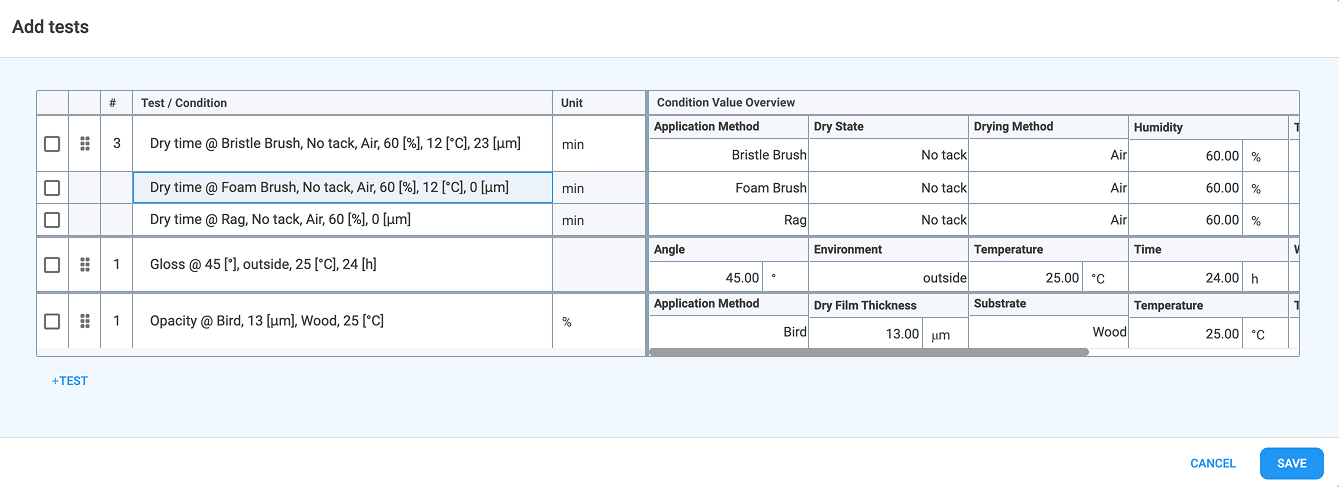
When saved, the system will add all necessary rows to the Tests table with all user-defined properties, and their respective conditions.
Key features and possibilities for interaction:
Test Methods (Strict)
Test Methods (Flexible)
Single Property
Multiple Measurements can be added for test results within a trial by right-clicking the desired cell and choosing Multiple Measurements from the displayed list of options. This will open a drawer on the right-hand side of the screen.

If Multiple Measurements is selected after the test result has been entered into the Tests table, that value will be auto-populated as the first measurement in this new view.
Additional measurements can be added to the Measurements table. The system will calculate values for:

Potential outlier will be displayed in line with a measured value If the system detects any value outside the defined range. If the user agrees with this assessment, the measurement can be marked as an Outlier by clicking the checkbox. The system will exclude any outlier measurements in the provided calculations.
When multiple measurements are captured, the Tests table will show the average value of those results in Italics.
Once the test results have been associated with multiple measurements, a regular click on the cell will open the measurements drawer.
Within the Tests section, there is a Sample Info table where a user can add sample-related information for each actual trial. Information includes:
Values in Original Quantity and Used Quantity will automatically calculate the Available Quantity of a sample.

The Workspace record includes a Conclusions section to provide the user with a space to include information for:

Once complete, additional actions can be taken:

Once a Lab Book is complete, a Final Conclusion can be applied. This record can be added by clicking Final Conclusion button:
There can only be one Final Conclusion record per Lab Book. If a selection is made for Best Performing Trial in either of the above locations, that trial name will be applied to the created Final Conclusion record.
At the end of every Workspace record, there is an option to select Scan All Trials. This will open a fullscreen modal for Best Performing Trial(s), displaying the top performing trials (10 maximum) within the current Lab Book.
However, certain requirements must be met for this feature to be enabled:
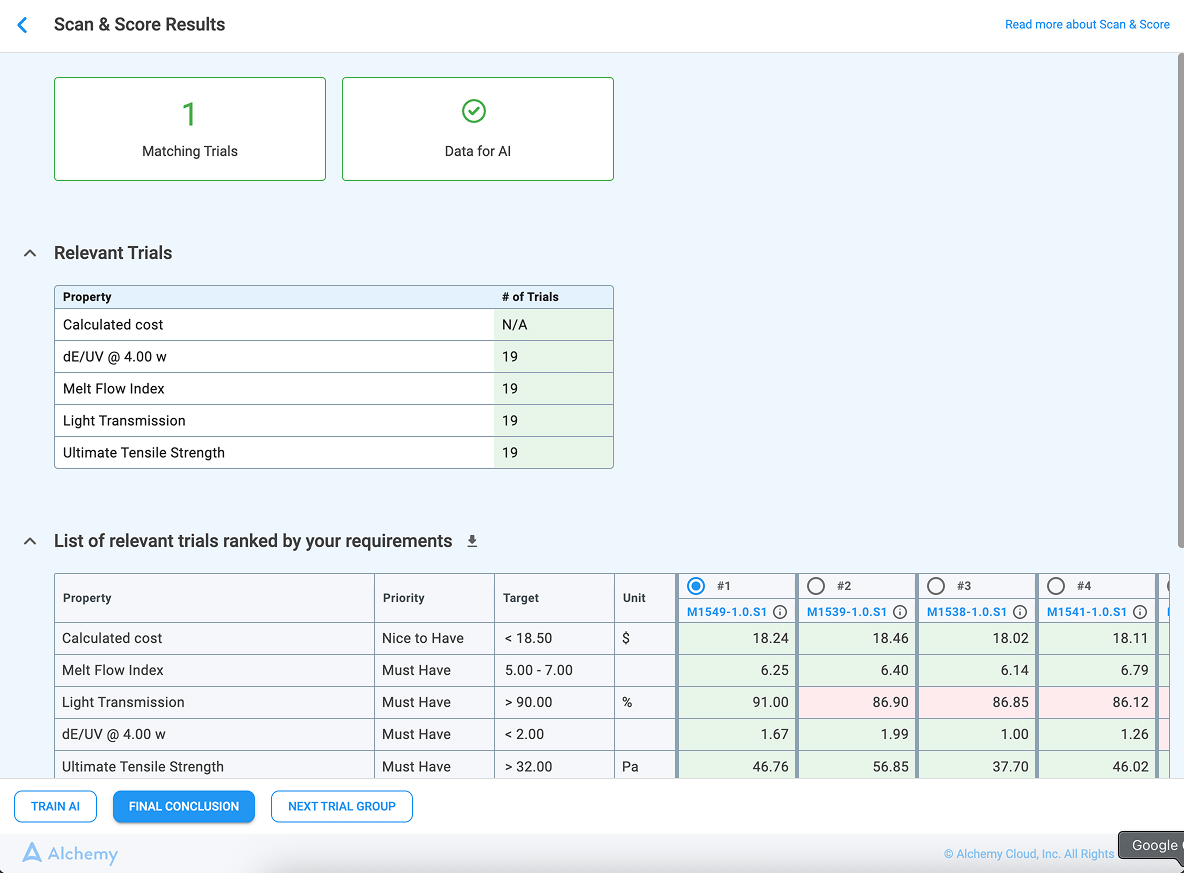
The top of the modal displays three boxes:
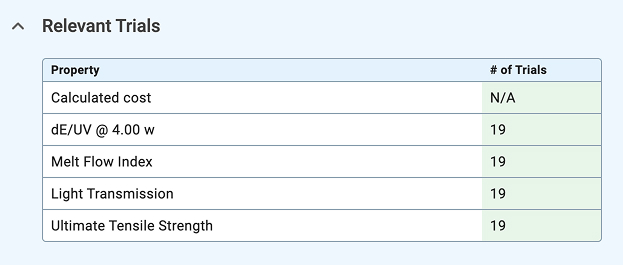
The next section, LIst of relevant trials ranked by your requirements, of the modal displays a table of trials, in matching order, and contains:
Applicable properties for these matching trials are displayed below:
Once the Best Performing Trial is selected, two additional options are enabled:
Train AI - In case you want to get better results and performance of your formulation work.
Lab Book analytics, in the form of auto-generated charts, can be accessed within the Workspace record by clicking the chart icon. This opens a drawer on the right side of the screen and refreshes with the latest data each time the icon is clicked.

Target Properties displays how actual trials are performing from the perspective of calculated and measured targets. This allows the user to view how properties are changed for each trial by varying conditions.
A legend is displayed at the top of the drawer, displaying all trial names and their associated color that will be used in all displayed charts. The legend also acts as a filter for the drawer. When a trial name is clicked in the legend, the text will be displayed in strikethrough and the color will be excluded from all charts inside the drawer. A second click returns the trial data back to all views.

The Visualization drawer contains a series of charts for all tested and measured numerical properties. Charts are listed in order of the requirements priority and appear in the following order:
Each chart also has the ability to:
There are three types of charts that could be displayed in the Visualization drawer:
A bar chart will be displayed if a property has no associated condition, or its conditions are not varying. Bars will be displayed for each trial in the Workspace record, showing the value of the property per trial.

A scatter chart will be displayed if a property has at least one varying condition (e.g., Density over Temperature). In the event a property has more than one vary condition, a scatter chart will be displayed for each.
Property values will be displayed on the y-axis, while condition values will be on the x-axis. Trials are shown as dots, color coordinated to the legend at the top of the drawer. The system automatically calculates the regression line for each trial and displays the information beneath the chart.

A spider chart will be displayed if a property has at least one varying condition with predefined values (e.g., Substrate when measuring Opacity). Selected values for that variable condition will be used for defining the spider’s legs (axes), and each trial will be displayed as a separate area.
In the event a property has more than one varying condition (e.g., Substrate and Time when measuring Opacity), a similar spider will be displayed with substrate values as spider’s legs. Areas will represent the pair trial - another condition (e.g., Trial 1 on day 1, Trial 1 on day 7, Trial 2 on day 1, Trial 2 on day 7, etc.).

A variety of integrated record templates exist to support Alchemy’s Lab Book and can be categorized in the following groupings:
Users can create new records by clicking + New in the left-hand navigation panel. This opens a drawdown menu where the necessary record can be selected from the list. A modal will open, allowing the user to input the values required to save and create the record.
Each record contains a General Information section that is used to document relevant high level information. Additional record-specific sections may follow. Details of each record template can be found in the following subsections.
The creation and use of these record is dependent upon the user having the appropriate permissions. Contact the system administrator if there are access issues.
However, the metadata for these record templates cannot be configured, regardless of permissions. The templates are instrumental to the backend data model that supports AI/ML features within the system.
The Material record is a data structure used to store information about raw materials that may be used in an organization's product R&D and manufacturing.

The record contains the following General Information fields:
Note: The naming pattern generated in the Code field is based on the value selected in the Category field, found under the Categorization section.
In the event the Category field has not been set, the generated code will appear with the naming pattern used for Other.
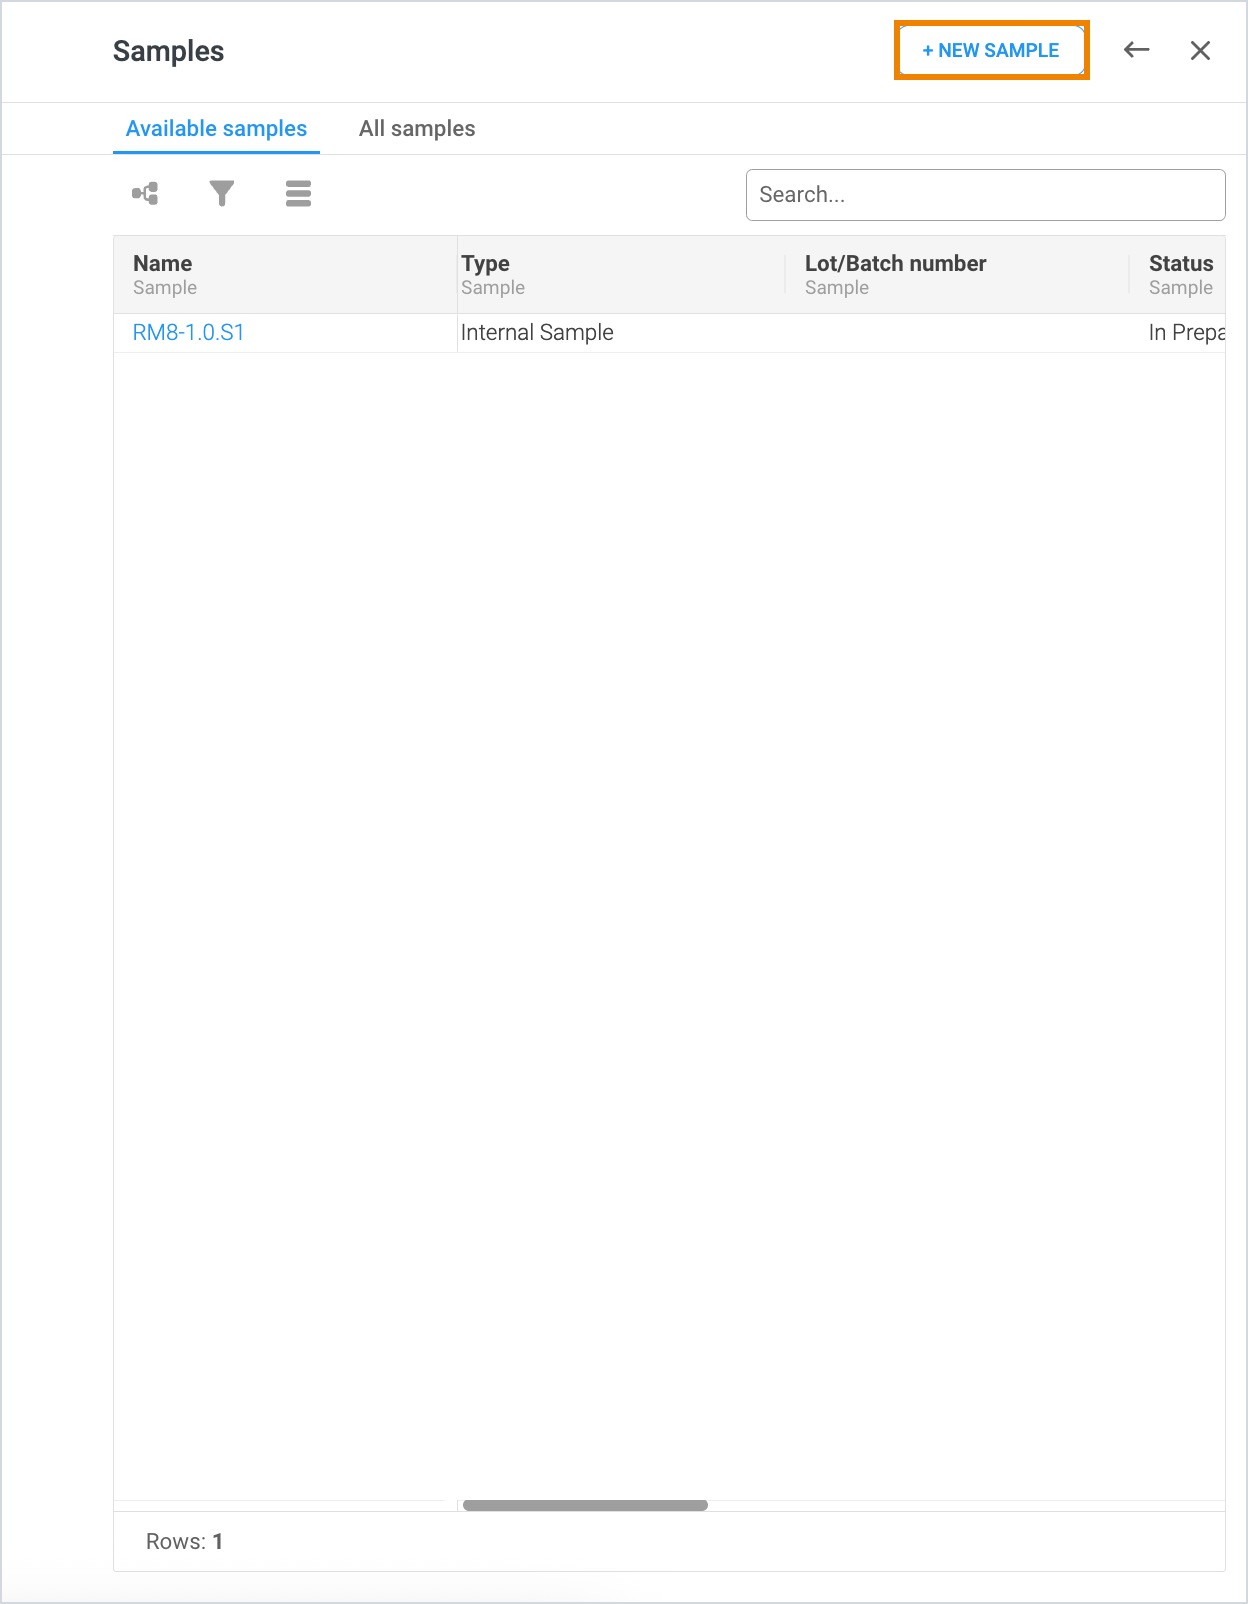
In addition to seeing current and historical samples of the material record, this drawer can be used to create new samples. After opening the Sample drawer, users can click + New Sample in the top right corner. This action opens a new Sample record that can be completed. Once all required fields have been filled in, the record can be closed and upon refresh of the material record Sample drawer, the newly created sample will appear.
A new material version can be created by clicking + New Version within the Material Versions drawer. This action opens a new Material record as a duplicate of the original material. Version numbering would increase from 1.0 to 2.0 when creating a new version of the material.

The Categorization section of the Material record includes:

The Suppliers section of the Material record includes:

The Documents section of the Material record includes:

The Chemical Information section of the Material record includes:

The Hazard and Safety section of the Material record displays the GHS pictograms related to the material:

The 1:1 Replacements section of the Material record displays a table used to list any applicable replacements.

The Specifications section of the Material record displays a list of all properties associated with the material’s type or subtype. The table will only be visible if the fields have been selected and there are properties associated with them.
Targets and Value for calc. can be defined for all specifications — refer to Requirements for additional information. Values will be used in all calculations and color-coded based on the given targets.

The Recipe section of the Material record includes:

The Sample record is a data structure used to store information about physical substances that undergo testing to discover their properties.
Within Alchemy, Sample records are used:

The record contains the following General Information fields:
Note: The sample status automatically changes to Opened when a sample is consumed. When the available quantity of the sample becomes zero or below, the status is automatically updated to Not Available. All other status changes are done manually.
The Availability and Usage section of the Sample record includes:

The Sample Location section of the Sample record includes:

The Hazard and Safety section of the Sample record displays the GHS pictograms related to the material. This information is pulled directly from the origin material and is uneditable from the Sample record.
This section will not be visible until a Material has been associated with the sample.

The Sample Label record is used to generate a printed label to attach to a sample container.
It can be created by clicking the Print Label button from the Sample record. Once a label for a sample is made, additional clicks will display the same label as what was previously printed.

Every Sample Label record has the following information:
The Chemical record is a data structure used to store information about substances an organization is using.

A new Chemical record has the following fields:
INCI, also known as International Nomenclature Cosmetic Ingredient, is a database of internationally recognized names of cosmetic ingredients. Use of the INCI Name record will enable a user to link chemicals used to any applicable INCI Names, maintaining the connection to its international naming conventions while being able to utilize organization identifiers when running trials.

An INCI Name record has a single field:
Specification records relevant to the Lab Book include:
Conditions can be used in Alchemy to describe the circumstances under which something is measured, such as the temperature and humidity for a dry time measurement or time interval testing of bacterial growth.
Much like Properties, conditions can be added “on the fly”. Once applied, Alchemy automatically expands your data model and metadata, and propagates the addition(s) to the internal library of conditions. Once a condition is defined, it becomes available for use by users with the appropriate permissions within:
🔐 Conditions can be applied only to the production tenant, not the UAT.

The General Information section of the record includes:
For additional information regarding types supported by Alchemy, please refer to the section Property: Property Types
⚠️ When a condition is created, it must be applied by clicking the Apply button to use it across the system. Non-applied, or Draft, conditions are not included in data models, and metadata cannot be specified as a target or be measured.
Condition records will also display:
Once all required fields are complete, the condition can be applied to and used in the system. If changes need to be made to a condition, certain fields can be updated including:
Any changes made to these fields or selections will enable the Apply Changes button and issue a cation that the condition contains unsaved changes. Once clicked, all changes will be saved and displayed in the system.
Fields that cannot be updated once a condition has been applied to the system include:
In Alchemy, a property can be used to characterize many elements in the system including:
Properties can be added added to the system at any point in the process. Once applied, Alchemy automatically expands your data model and metadata, and propagates the addition(s) to the internal library of properties. Once a property is defined, it becomes available for use within a Lab Book by users with the appropriate permissions:
🔐 Properties can be applied only to the production tenant, not the UAT.
The Property record contains the following General Information fields:

⚠️ When a property is created, it must be applied by clicking the Apply button to use it across the system. Non-applied, or Draft, properties are not included in data models, and metadata cannot be specified as a target or be measured.
This type of usage allows for property values to be manually entered into the system, or it can be calculated based on other measured properties. Once applied, this property is available for use in Tests tables across the system.
Selection of this usage will trigger an expression field to define any applicable:
Two additional sections will also become visible at the bottom of the Property record if this usage is selected:

This type of usage calculates properties with a formula and can be based on other properties or information from the Trials table. However, with the appropriate configuration this property usage can also be defined to allow for the value to be editable inside the Calculations table. Once applied, this property is available for use in Calculations tables across the system.
Selection of this usage will trigger two additional expression fields to define any applicable:

There are eight property types available within Alchemy. Depending on the type selected, additional fields will be added to the record. These fields are outlined below.
Unit Type & Default Unit: Supported unit types, as well as with applicable units, can be found in Appendix 1 - Units Library.
Predefined Values: If enabled, a field appears where a comma separated list of predefined numerical values can be entered for the property.
Applied properties will then be displayed as a dropdown with a list of these values.
Decimal Places: Used to define the desired number of decimal places for a displayed property value across the system.
The default value is two decimals.
Scientific Notation: Used to define whether a property value should be displayed in scientific notation.
Use Property for Formulating: Used to enable a property to be selected as the primary formulating input within a lab book.
Selection of this option will trigger an expression field to define the calculation of the weight for each material based on the entered value:
If enabled, the system will automatically select the option Use property for Compare Material Contribution while formulating. This is due to Scale functionality. The system needs both expressions to be able to recalculate weights.
Edit Expression for Total: This enables users to change the SUM expression for totals in the recipe table.
Selection of this option with trigger an expression field to define the the total calculation:
If Use Property for Formulating is also selected then an additional field will be displayed:
Predefined Values: Numerical and text values only.
Additional information regarding this option can be found in the Property Types, Number section.
Date & Time Format: Used to define the format that will be used whenever the property is displayed in the system. The default format is:
Allow multiple: If enabled, multiple attachments are able to be added to this property type in the system.
Information on supported file types can be found in Appendix 2.
Use Property for Formulating: Additional information can be found in the Property Types, Number section.
Allow multiple: If enabled, multiple users are able to be added to this property type in the system.
No additional field is displayed in the property record. If this type is selected, a field will be displayed for the property value which will require the entry of a valid url format.
A record reference property type allows the user to define the criteria around which record templates, as well as any desired columns, are visible to a user when the property is used in a lab book.

Within the Property record, one or more record templates can be selected. Filter criteria can be applied for each record template listed so only the names of records with corresponding templates and criteria will be visible to the user interacting with the field and selecting the property value.
Once a value has been selected from the dropdown, columns visible from the referenced record(s) will be displayed. Visible columns can include:
Note: To enable a property or condition to be used as a record reference, the templates must be appropriately configured in the configuration portal. Contact your administrator or Alchemy representative for any assistance with enabling this feature.
Once all required fields are complete, the property can be applied to and used in the system. If changes need to be made to a property, certain fields can be updated including:
Any changes made to these fields or selections will enable the Apply Changes button and issue a cation that the property contains unsaved changes. Once clicked, all changes will be saved and displayed in the system.
Fields that cannot be updated once a property has been applied to the system include:

If an applied property is no longer needed, it can be archived in the system to prevent it from being used further. Clicking the Archive Property button will allow for the system to retain all historical trials or test methods the property was used in. While this action removes the property from use in lab books or test methods, the record can still be accessed and unarchived for future use by clicking the Unarchive Property button.
Test Methods are used in Alchemy to define any associated conditions, which are then used to perform defined trials in a Lab Book.
Test Methods can be added at any point in the process by clicking + New in the blue navigation bar. Once added, Alchemy automatically expands your data model and metadata, and propagates the addition(s) to the internal library of test methods. Once a test method is defined, it becomes available for use by users with the appropriate permissions within:

The Requirements and Procedure section of the record is used to define all related Requirements and Procedure Descriptions in free-text entry fields.

The Tests section is utilized to select measured properties from the system's library of properties designated as Measured in Lab Tests. Each selected property is presented in a table, allowing for reordering within the test method, and this order is preserved when used in a Workspace or other record where test method is added for testing. A table for capturing measurements will be displayed for each property.

The columns for each property table include:
New rows can also be added to the property tables for users to:
Note: Each property table needs at least one row before the Test Method can be used in a Lab Book.
Material Type records are used to categorize materials in the system and can be created at any point in the process by a user with the appropriate permissions.
The General Information section of the record consists of the Material Type Name.
The Subtypes section of the record allows users to associate all applicable subtypes that are for the material type.
Note: Subtypes can only be associated with one material at a time.
The Specifications section of the record allows users to list properties associated with the material type. Selected properties will then display on all material records marked as the corresponding type.

Material Subtype records are used to categorize materials in the system and can be created at any point in the process by a user with the appropriate permissions.
The General Information section of the record consists of the Material Subtype Name.
The Belongs To section of the record allows users to all material types the subtype is associated with.
The Specifications section of the record allows users to list properties associated with the material subtype. Selected properties will then display on all material records marked as the corresponding subtype.

The Product records relevant to the Lab Book include:
The Product record is a central element to the Alchemy data structure, housing multiple versions of a material marked as Finished Goods and approved for production. It is a comprehensive record of packaged materials, encompassing essential details such as:

The General Information section of the record has the following fields:
The Active Material section of the record is used to link a single material to the product. However, multiple versions of the material may be displayed in the table.
The Product Family record is used to categorize all products and can be created at any point in the process by a user with the appropriate permissions.
The record consists of a:

The Product Subfamily record is used to categorize all products and can be created at any point in the process by a user with the appropriate permissions.
The record consists of a:

The Location record is used to define storage information and conditions of items for an organization or department.
The General Information section of the record includes:
In the Sublocation section, multiple sublocations can be associated with a Location record.

The Company record is used to define relevant information related to companies an organization may interact with. Interactions may include:

The General Information section of the record includes:

The Location List section allows users to create as many new locations as needed to associate with the company.
The Contacts List section allows users to create as many new contacts as needed to associate with the company.
The Subsidiaries section allows users to create as many new subsidiary companies as needed to associate with the company.
The Contact record is used to store information relevant to an organization's point of contacts for various companies they interact with.

The General Information section of the record includes:
The following supplemental material is used to support the above documentation.
The table displays all system supported auto-conversions between units of the same type.
This table displays common file types supported by Alchemy for uploads or attachments.
The table below displays file types forbidden by Alchemy for uploads or attachments in order to adhere to security guidelines.
In both our user manual and API documentation, you'll find comprehensive instructions on how to use our API for downloading your data. Our API is designed to give you access to all your personal data that we have stored, encompassing both the information you have provided and the data generated during your use of our services. By following these guidelines, you'll be able to effectively retrieve your information during or at the end of your relationship with Alchemy.
Additionally, it's important to note that when you decide to end your association with Alchemy Cloud, we ensure that all of your data is thoroughly deleted from our systems. This step is crucial in making certain that Alchemy Cloud retains no access to your data once your service has concluded.